Introduction
In this article we’ll continue setting up the CI/CD system. We’ll setup Kontena-based acceptance testing environments into UpCloud and configure them into our Shippable CI/CD pipeline.
Acceptance Test Environment Setup
New Kontena Environment Creation
To start with, we’ll create acceptance testing CI (atci) and acceptance testing environments. The atci environment is meant for running automated acceptance tests and the acceptance testing environment is meant for manual acceptance testing:
|
1 2 3 |
$ kontena grid create atci $ kontena upcloud node create --grid atci --username <upcloud_username> --password <upcloud_password> --ssh-key ~/.ssh/id_rsa_upcloud.pub --zone de-fra1 |
|
1 2 3 |
$ kontena grid create acceptance-testing $ kontena upcloud node create --grid acceptance-testing --username <upcloud_username> --password <upcloud_password> --ssh-key ~/.ssh/id_rsa_upcloud.pub --zone de-fra1 |
We’ll follow the setup according to the test environment setup in previous articles. We’ll set up the acceptance testing environments under at. and atci. subdomains.
Before integrating the environments with the CI/CD it’s good to make sure everything is working as expected by making a manual deployment after everything is set. So at this point we’ll write the needed variables into the Vault using the acceptance-testing-ci and acceptance-testing grids. We’ll also configure the DNS records, setup Let’s Encrypt certificates and make sure the services work well after manual deployments.
Acceptance Tests
Tech Selection and Setup
There are several viable tech choices for implementing automated acceptance tests for JavaScript applications. Selenium based solution are quite popular, but there are also interesting alternatives like Nightmare.js. Nightmare.js uses Electron under the hood, supports headless mode and runs tests very fast compared to many other solutions. It’s also quite independent package and simple to setup for the environments we’re using. It has some limitations – it’s not possible to run the tests with different browsers out-of-the-box, for example – but in this project those are not major limitations.
Some frameworks support generic languages like Gherkin language to define the tests while some use their own DSL. I really like the idea of writing the tests using an easily understandable language and the Cucumber.js + Gherkin language is a very compelling alternative. With Cucumber it’s also possible to follow BDD practices.
I ended up selecting Cucumber and Nightmare.js for this setup to make it possible to use BDD. Therefore we’ll define the acceptance test scenarios using Gherkin language, use Nightmare.js to implement the tests scenarios and use Cucumber to run the tests. If BDD wasn’t a requirement, I’d have selected Jest and Nightmare.js to keep things more simple and straightforward.
Acceptance Test Project Setup
For acceptance tests we’ll create a new acceptance-tests repository in GitLab. We’ll install the needed npm modules with the following command:
|
1 2 |
acceptance-tests$ npm install --save-dev nightmare cucumber cucumber-junit eslint eslint-config-airbnb eslint-plugin-import eslint-plugin-jsx-a11y eslint-plugin-react |
To keep the test code in good shape we’ll use the same eslint airbnb configs as with the code repositories. The Cucumber-junit module is used for converting the test results into Shippable compatible junit format.
To run the tests, we’ll use the following test script. The script writes results to results.xml in junit format and also displays the results in console:
|
1 2 3 4 |
"scripts": { "test": "cucumber-js --format=json:results.json --format pretty && cat results.json | cucumber-junit > shippable/testresults/results.xml" }, |
Test Definitions
Cucumber finds and reads the features and scenarios from .feature files and calls related step definitions from the step_definitions folder:
|
1 2 3 4 5 6 7 8 9 10 |
. |-- features | |-- login.feature | |-- counter.feature | |-- step_definitions | | |-- cucumberApp.js | | |-- cucumberHelper.js | | |-- ... . |
The implemented application is just an example and therefore the related scenario and feature descriptions are also somewhat imaginary:
|
1 2 3 4 5 6 7 8 9 10 11 12 13 14 15 16 17 18 19 |
Feature: Service login The counter feature is not meant for public use. The main page can be accessed by anyone, but the counter feature is limited only for selected users. Scenario: Access to the login Given I visit the service website Then I have access to the service login Scenario: Access to the counter Given I visit the service website When I login into the service with valid credentials Then I have access to the counter features Scenario: Logout from the service Given I visit the service website When I login into the service with valid credentials When I logout from the service Then I have access to the service login |
|
1 2 3 4 5 6 7 8 9 10 11 12 13 |
Feature: Counter feature An up counter is needed due to a super important business reason. Counter starts from a positive number and service users can increment it. Scenario: Counter starts from a positive number Given I'm a permitted counter feature user Then the counter value is a positive number Scenario: User can increment the counter Given I'm a permitted counter feature user When I increment the counter Then the counter value is incremented |
For the moment the acceptance tests wouldn’t pass, since we haven’t written the application components yet. To make it possible to verify the pipeline functionality, we’ll write the feature step definitions in a way that they always pass. In the upcoming articles we’ll finalise the application components and implement the proper step definitions for the acceptance tests.
Cucumber implementation for the Given I visit the service website step (see the acceptance-tests repo for more):
|
60 61 62 63 64 |
Given(/^I visit the service website$/, (callback) => { this.helper.goTo(this.nightmare, (error, testResult) => { handleTestResult(error, testResult, callback); }); }); |
And related Nightmare.js test implementation:
|
34 35 36 37 38 39 40 41 42 43 44 |
goTo(nightmare, callback) { return nightmare .authentication(this.basicAuthUser, this.basicAuthPassword) .goto(this.domain) .then(() => { callback(null, formatResult(true, 'Page loaded', 'Page loaded')); }) .catch((err) => { callback(err, formatResult(false, 'Page loaded', err)); }); } |
Before continuing to the system integration we’ll verify the acceptance tests functionality locally:
|
1 2 |
acceptance-tests$ TARGET_HOST=127.0.0.1.xip.io BASIC_AUTH_USER=user1 BASIC_AUTH_PASSWORD=pass1234 npm test |
Acceptance Test Integration into the Build System
Shippable Machine Image
First of all, we’ll take the 5.5.1 Shippable Machine image into use via Subscription -> Settings -> Options. Latest versions provide Ruby and xvfb-run out-of-the-box which is very convenient.
PEM Keys to Integrations
To get rid of the Kontena SSL connection warnings and making the connection between CI system and Kontena master slightly more secure, we’ll use the .pem file instead of ignoring the SSL warnings with SSL_IGNORE_ERRORS=true definition.
We’ll add the needed integration via Account settings -> Integrations -> Add Integration -> Create Integration (PEM key) and set the Kontena key from ~/.kontena/certs/<kontena_master_ip>.pem. While adding it, we’ll also link it into the article-project subscription and enable the integration for all the projects belonging to the subscription via article-project subscription integration settings. With the integration, the SSL key is now available in the /tmp/ssh/ folder for our runCI and runSH jobs.
Acceptance Tests Project
We’ll enable acceptance-tests project for the Shippable CI. It would’ve been possible to run the acceptance tests CI as runSH job, but runSH jobs don’t display test results in the GUI for the moment. The runCI job is also more flexible and faster to configure since environment variables can be defined via shippable.yml without using external resources, for instance.
Following shippable.yml defines the acceptance tests runCI job:
|
1 2 3 4 5 6 7 8 9 10 11 12 13 14 15 16 17 18 19 20 21 22 23 24 25 26 27 28 29 30 31 32 33 34 35 36 37 38 39 40 41 42 43 44 45 46 47 48 49 50 51 52 53 54 55 56 57 58 59 60 61 62 63 64 65 66 67 68 69 |
# Language setting language: node_js # Version number node_js: - 6.10.2 rvm: - 2.3.3 branches: only: - master env: global: # KONTENA_MASTER_IP - secure: nobgy3lWnB/rszH/vt+xpleF8dTswjfyjPTRlT9E1M1Ubg15LN5ZRmid2V5KFr/njFImYC8Tfe8Hb+XrZlRI6wE1pxqiabBcJ22LGUGwzTqK1ofQTW7nxQ8BgS6n133RUriQ5v4xBcXBEVDv2jL/Y8apcDgmIm7uUI4/QA3KMzk2A79eZdwyvOIfQelUwatxhpUbsXb0SmCcW4Q//Tm0LvDcLxpxXaoN64tYfUEd1/UrQtZvL+lOM6hSQX5mt7YhQKUuHLw7FJ44aEABkYcEgr+WoR+3mIJY0I/JuDPXb187PKlz2eCs1if4mJKfuGHLqLoOKlQFJP1AeeOJPu24uw== # KONTENA_LOGIN_TOKEN - secure: FnIYGmfZVB5z58vVT6y97O3Z0mABHXdE1WIEUOQM0BR5ChaJhazgBqStQKUtEQRZcEP+0NrueMsJ9z0DL/104HrOeBufZAZWw/19FLnav+d9lYnASVDPhSNE1ol97HOGflhEp7KcLMTyn5kXgSP8ofCGfDyajpt+OKboV8jl/1gJdqIL6rRQXT/jDnaYHXSPoDQggiaHfHdNnGHNDbGoON9EZfEXQ2mOH/PRfiT4fE8mfTUmTKCqCQ7DASC7C1yYgT73B4ACVmqMLtuEQgQriV3FdY1tTpCHKZtBLwv9qxi2/8VuAmwM4nToQHei3BjWwlfHNUkCsSg+kPYnXuURJA== # KONTENA_GRID - secure: cOZi6xvLthLA4gewayHHHHIdm10Q78j2yhSYavdWQurElPtExwUNfY6xpe9A7Rd35uBfEwBheWog13Z6FVyLPwf8AjrKcyIikfbUqSmoHpJKUpfjfgBmTsGZ8bxAp1HUGvj+gSww4kLsUznqDkpIlJdDo2K4pOznV1rKAx8fb/wCz+VXkGVJUhlPwv74f++p2ag/tzXZYgIO8h54gbhAbcopZjKcliHmNxlLdcL/F11BrjkY1xQZAAvywP2rJG8e3xdZBynvOlAAJe58HwuSUioXmbXUW3Ckf6E+OwY2DQidAthGzXmQYeR1pSqmq7Ege1coEtFdkFfvXKmxkDjooQ== # TARGET_HOST - secure: BnJZW4Wa6cSZW7wbzRqKQNV3SrNLhWlXl/SBG7UitlGO9EkHfnQItRkmZcg8P2/8Eli6pLDJLRhBMjaANt8JzB5nBocvqVP2M3imxPGaXeHCmDxAJK5CCXkSQg63G6xIqDLeGT7Inu+ucx+D+pH5R6apxwIHkW2qEm4MuXSrCSoxOvjzwU6MnT1HLpge/W+PLFG6IXEDByJylQa4vv0z+jc3/NZYOGNeo4amHdhoN+q55aoidcjTZwiRVP9hQyJ6NZDV38b9LwqvzusnAtXbOtqGPIL6m5o60Hpb5dw+Ejb03O07uft86WHtn1WNKpM5lb0AwE2rCHE/xNTTj+h3uw== # BASIC_AUTH_USER - secure: K/CEqYURbUX7wzjacCJcev3bqWQGtJpAHtFiZ7cj27syraTOHOEb/rmNplCgLc0goNky0XROugKQYuOR2gbF/VPolaww7doSdfIOl8Y8M/jjvuZjhj71/uSABCZ2NOl1MP8MsnaO7VZoZqQ6wHP2pBTnV7ZJDgT23PbVZ0nZL7OgWmm+IDrS57RpUS0XVZurKITmJzot91t7IKHcfmfWgHuw7STpffnmv0YgBVI0Q6vTz9k9SPOX1t1I63BDzAud7KEGqzoHALI+xXIf135B5XibM8JinE3rDKTJsRxzkGI8Fa1Fu+j+6RmX6HDB0XRnHz93h0umiG+o5TuHNHIHtg== # BASIC_AUTH_PASSWORD - secure: GbbOX+54Kc31uqzFIkLze1xC0WZuHbZRD6ptUB1YXqOFINcEsnsTf5TlfetUJpjxjEzWXpk5PwUqj31PZoliGYbYQo1wRJ4kBHZef001F17lMYcKUNv53rtn4lpWVL+OQUPeNToXlGKBei9AH0u2rLV5mC8pfx3O6i51cGWHzbw75wswmRwxUKuQRyNDNlrxEEK4U2K/3UxEy3NjdmSU5LPP4Y9Ft1izCyqQp5+tCP8WWMsgG+lz8P42PtOYEoN1UK8FdUy+keJGD+iJ6qH1OUifKq6miwYWa0EkjGDko1QnfURq+0Ca7a7GKHCVEAaVlSrqLfet6i3G/5O3OiHT2A== build: ci: - npm install npm@4.5.0 -g - npm install --no-optional --loglevel warn - source /usr/local/rvm/scripts/rvm - ruby -v - git clone git@gitlab.com:article-projects/deployment-scripts.git - cd deployment-scripts && ./scripts/kontena-install.sh - ./scripts/kontena-login.sh - export KONTENA_FRONT_SERVICE_VERSION=$FRONTIMAGERESOURCE_VERSIONNAME - echo $KONTENA_FRONT_SERVICE_VERSION - export KONTENA_APP_SERVICE_VERSION=$APPIMAGERESOURCE_VERSIONNAME - echo $KONTENA_APP_SERVICE_VERSION - export KONTENA_AUTH_SERVICE_VERSION=$AUTHIMAGERESOURCE_VERSIONNAME - echo $KONTENA_AUTH_SERVICE_VERSION - ./scripts/kontena-ci-area-deploy.sh - echo $TARGET_HOST - xvfb-run npm test on_success: - echo "versionName=$KONTENA_FRONT_SERVICE_VERSION" >> $JOB_STATE/verified-front-image-resource.env - echo "versionName=$KONTENA_APP_SERVICE_VERSION" >> $JOB_STATE/verified-app-image-resource.env - echo "versionName=$KONTENA_AUTH_SERVICE_VERSION" >> $JOB_STATE/verified-auth-image-resource.env integrations: key: - integrationName: KontenaKeyIntegration type: pem-key notifications: - integrationName: email type: email on_success: never on_failure: never on_pull_request: never |
Overall Pipeline
Until these configurations, only the CI build jobs have been shown in the subscription specific Shippable Pipeline view. We’ll use shippable.resources.yml and shippable.jobs.yml files to configure the pipeline and in this example the files are located in the deployment-scripts repository.
To enable the pipeline, GitLab integration has to be enabled for the article-projects subscription via Subscription -> Settings -> Integrations -> Add Integration. After enabling the integration, the deployment-scripts repository can be set as syncRepo via Single Pane Of Glass (SPOG) view’s Add resource button. After the pipeline is read from the repository, the pipeline is automatically updated from the repository.
In the deployment-scripts Git-repository the latest Kontena descriptors are put into the descriptors folder and some shippable configuration scripts are refactored into script files under the scripts folder. To enable access to the Git-repository, the Shippable SSH key (Subscription -> Settings -> Options -> Deployment Key) was given access to the GitLab repository (Settings -> Repository -> Deploy Keys).
We’ll skip quite a few details, but here is the overall pipeline:
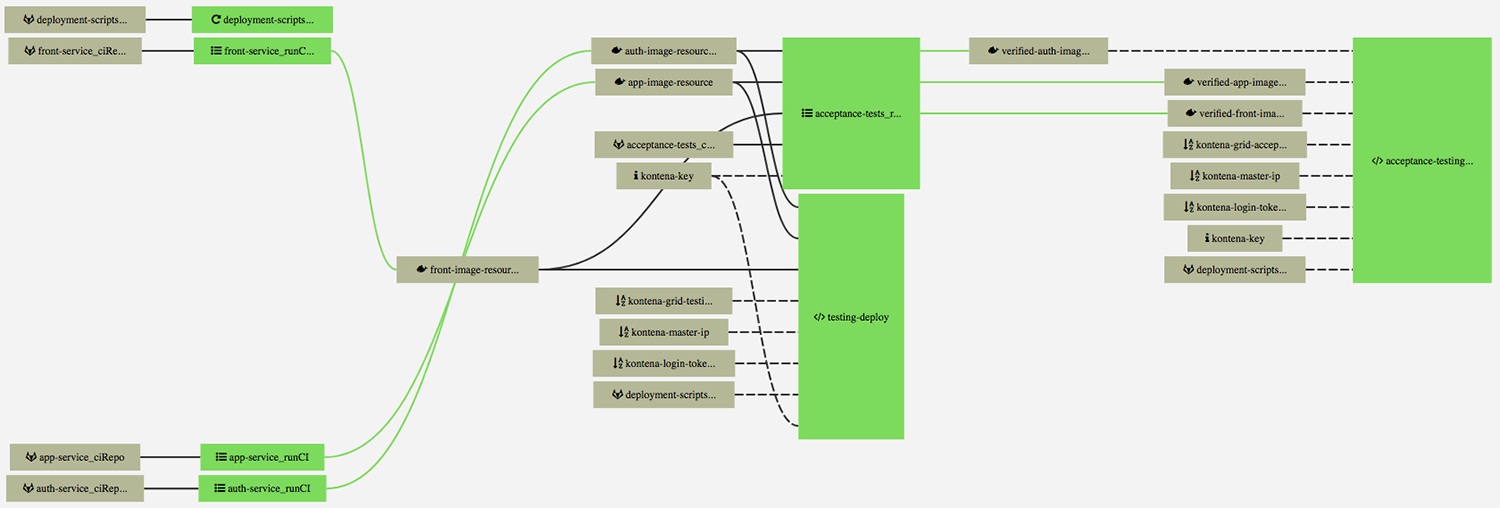
In general, the pipeline is now triggered by Front, App and Auth service Git-repository changes. Changes made to the deployment-scripts repo will also trigger a job to automatically check if the pipeline related definitions have changed.
An acceptance test runCI job is automatically triggered when either Front, App or Auth service CI builds are passing and a new image is created. For CI deployments we created a new descriptor (kontena-ci-areas.yml) which is similar to other test environment descriptors except for some details regarding database persistence. CI jobs should be always run from a clean slate and therefore we don’t use stateful database services. Commits and pull-request web hooks were disabled for acceptance-tests project via project settings, since there isn’t any need to automatically trigger the acceptance tests CI build when the acceptance tests Git-repository is updated.
The testing environment deployment works as before, so that all components passing their unit and API tests are automatically deployed to the testing server; whether they pass the atci or not. The testing environment deployment functionality was removed from the Front, App and Auth runCI jobs and refactored into a new runSH job (testing-deploy in shippable.jobs.yml).
An acceptance testing deployment job (acceptance-testing-deploy in shippable.jobs.yml) is defined in such a way that the job isn’t triggered automatically when the related resources are changed. The job must be triggered manually from the web UI and the deployment is done using the latest component images which have passed the acceptance tests CI.
All the pipeline related definitions are available in the deployment-scripts repository.
Summary
Overall the pipeline fulfils the requirements we set earlier in the testing and deployment overview article. The final part of the CI/CD pipeline – the production environment – will be added later after we have implemented the system components.